The documentation you are viewing is for Dapr v1.9 which is an older version of Dapr. For up-to-date documentation, see the latest version.
Quickstart: Publish and Subscribe
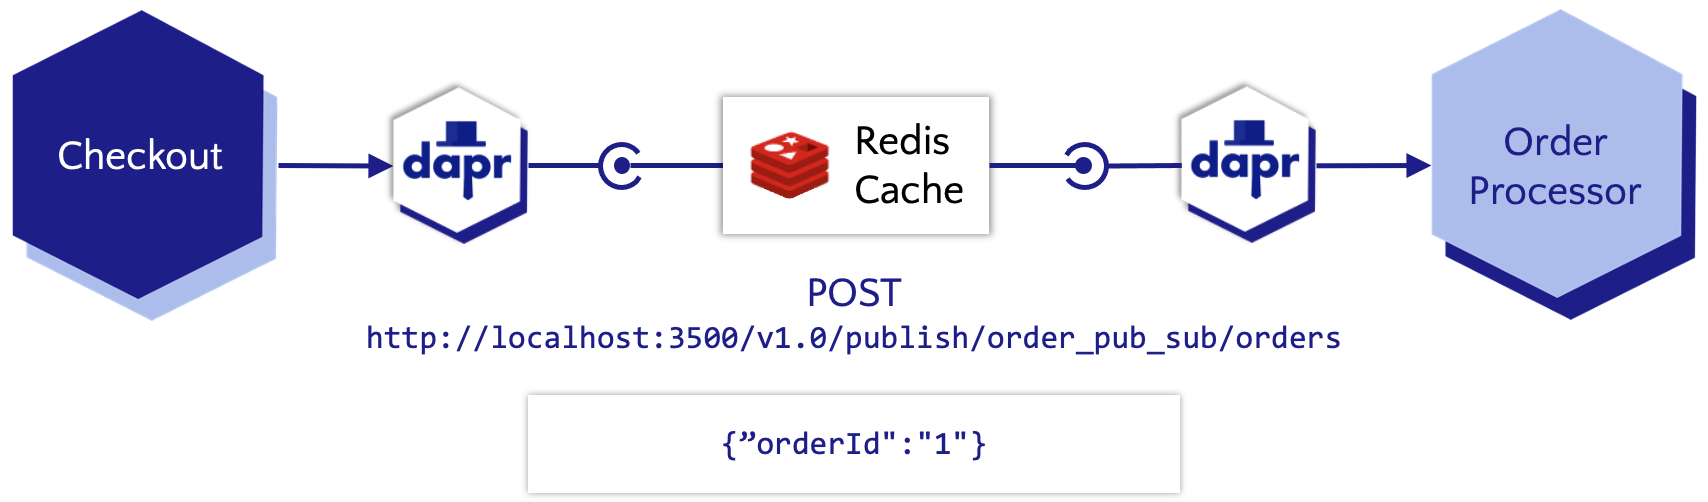
Let’s take a look at Dapr’s Publish and Subscribe (Pub/sub) building block. In this Quickstart, you will run a publisher microservice and a subscriber microservice to demonstrate how Dapr enables a Pub/sub pattern.
- Using a publisher service, developers can repeatedly publish messages to a topic.
- A Pub/sub component queues or brokers those messages. Our example below uses Redis, you can use RabbitMQ, Kafka, etc.
- The subscriber to that topic pulls messages from the queue and processes them.
Select your preferred language-specific Dapr SDK before proceeding with the Quickstart.
Step 1: Pre-requisites
For this example, you will need:
Step 2: Set up the environment
Clone the sample provided in the Quickstarts repo.
git clone https://github.com/dapr/quickstarts.git
Step 3: Subscribe to topics
In a terminal window, from the root of the Quickstarts clone directory
navigate to the order-processor directory.
cd pub_sub/python/sdk/order-processor
Install the dependencies:
pip3 install -r requirements.txt
Run the order-processor subscriber service alongside a Dapr sidecar.
dapr run --app-id order-processor --components-path ../../../components/ --app-port 5001 -- python3 app.py
Note: Since Python3.exe is not defined in Windows, you may need to use
python app.pyinstead ofpython3 app.py.
In the order-processor subscriber, we’re subscribing to the Redis instance called orderpubsub (as defined in the pubsub.yaml component) and topic orders. This enables your app code to talk to the Redis component instance through the Dapr sidecar.
# Register Dapr pub/sub subscriptions
@app.route('/dapr/subscribe', methods=['GET'])
def subscribe():
    subscriptions = [{
        'pubsubname': 'orderpubsub',
        'topic': 'orders',
        'route': 'orders'
    }]
    print('Dapr pub/sub is subscribed to: ' + json.dumps(subscriptions))
    return jsonify(subscriptions)


# Dapr subscription in /dapr/subscribe sets up this route
@app.route('/orders', methods=['POST'])
def orders_subscriber():
    event = from_http(request.headers, request.get_data())
    print('Subscriber received : ' + event.data['orderid'], flush=True)
    return json.dumps({'success': True}), 200, {
        'ContentType': 'application/json'}


app.run(port=5001)
Step 4: Publish a topic
In a new terminal window, navigate to the checkout directory.
cd pub_sub/python/sdk/checkout
Install the dependencies:
pip3 install -r requirements.txt
Run the checkout publisher service alongside a Dapr sidecar.
dapr run --app-id checkout --components-path ../../../components/ -- python3 app.py
Note: Since Python3.exe is not defined in Windows, you may need to use
python app.pyinstead ofpython3 app.py.
In the checkout publisher, we’re publishing the orderId message to the Redis instance called orderpubsub (as defined in the pubsub.yaml component) and topic orders. As soon as the service starts, it publishes in a loop:
with DaprClient() as client:
    # Publish an event/message using Dapr PubSub
    result = client.publish_event(
        pubsub_name='orderpubsub',
        topic_name='orders',
        data=json.dumps(order),
        data_content_type='application/json',
    )
Step 5: View the Pub/sub outputs
Notice, as specified in the code above, the publisher pushes a random number to the Dapr sidecar while the subscriber receives it.
Publisher output:
== APP == INFO:root:Published data: {"orderId": 1}
== APP == INFO:root:Published data: {"orderId": 2}
== APP == INFO:root:Published data: {"orderId": 3}
== APP == INFO:root:Published data: {"orderId": 4}
== APP == INFO:root:Published data: {"orderId": 5}
== APP == INFO:root:Published data: {"orderId": 6}
== APP == INFO:root:Published data: {"orderId": 7}
== APP == INFO:root:Published data: {"orderId": 8}
== APP == INFO:root:Published data: {"orderId": 9}
== APP == INFO:root:Published data: {"orderId": 10}
Subscriber output:
== APP == INFO:root:Subscriber received: {"orderId": 1}
== APP == INFO:root:Subscriber received: {"orderId": 2}
== APP == INFO:root:Subscriber received: {"orderId": 3}
== APP == INFO:root:Subscriber received: {"orderId": 4}
== APP == INFO:root:Subscriber received: {"orderId": 5}
== APP == INFO:root:Subscriber received: {"orderId": 6}
== APP == INFO:root:Subscriber received: {"orderId": 7}
== APP == INFO:root:Subscriber received: {"orderId": 8}
== APP == INFO:root:Subscriber received: {"orderId": 9}
== APP == INFO:root:Subscriber received: {"orderId": 10}
pubsub.yaml component file
When you run dapr init, Dapr creates a default Redis pubsub.yaml and runs a Redis container on your local machine, located:
- On Windows, under
%UserProfile%\.dapr\components\pubsub.yaml - On Linux/MacOS, under
~/.dapr/components/pubsub.yaml
With the pubsub.yaml component, you can easily swap out underlying components without application code changes.
The Redis pubsub.yaml file included for this Quickstart contains the following:
apiVersion: dapr.io/v1alpha1
kind: Component
metadata:
  name: orderpubsub
spec:
  type: pubsub.redis
  version: v1
  metadata:
  - name: redisHost
    value: localhost:6379
  - name: redisPassword
    value: ""
In the YAML file:
metadata/nameis how your application talks to the component.spec/metadatadefines the connection to the instance of the component.scopesspecify which application can use the component.
Step 1: Pre-requisites
For this example, you will need:
Step 2: Set up the environment
Clone the sample provided in the Quickstarts repo.
git clone https://github.com/dapr/quickstarts.git
Step 3: Subscribe to topics
In a terminal window, from the root of the Quickstarts clone directory
navigate to the order-processor directory.
cd pub_sub/javascript/sdk/order-processor
Install dependencies, which will include the @dapr/dapr package from the JavaScript SDK:
npm install
Verify you have the following files included in the service directory:
package.jsonpackage-lock.json
Run the order-processor subscriber service alongside a Dapr sidecar.
dapr run --app-port 5001 --app-id order-processing --app-protocol http --dapr-http-port 3501 --components-path ../../../components -- npm run start
In the order-processor subscriber, we’re subscribing to the Redis instance called orderpubsub (as defined in the pubsub.yaml component) and topic orders. This enables your app code to talk to the Redis component instance through the Dapr sidecar.
server.pubsub.subscribe("orderpubsub", "orders", (data) => console.log("Subscriber received: " + JSON.stringify(data)));
Step 4: Publish a topic
In a new terminal window, from the root of the Quickstarts clone directory,
navigate to the checkout directory.
cd pub_sub/javascript/sdk/checkout
Install dependencies, which will include the @dapr/dapr package from the JavaScript SDK:
npm install
Verify you have the following files included in the service directory:
package.jsonpackage-lock.json
Run the checkout publisher service alongside a Dapr sidecar.
dapr run --app-id checkout --app-protocol http --dapr-http-port 3500 --components-path ../../../components -- npm run start
In the checkout publisher service, we’re publishing the orderId message to the Redis instance called orderpubsub (as defined in the pubsub.yaml component) and topic orders. As soon as the service starts, it publishes in a loop:
const client = new DaprClient(DAPR_HOST, DAPR_HTTP_PORT);

await client.pubsub.publish(PUBSUB_NAME, PUBSUB_TOPIC, order);
console.log("Published data: " + JSON.stringify(order));
Step 5: View the Pub/sub outputs
Notice, as specified in the code above, the publisher pushes a random number to the Dapr sidecar while the subscriber receives it.
Publisher output:
== APP == Published data: {"orderId":1}
== APP == Published data: {"orderId":2}
== APP == Published data: {"orderId":3}
== APP == Published data: {"orderId":4}
== APP == Published data: {"orderId":5}
== APP == Published data: {"orderId":6}
== APP == Published data: {"orderId":7}
== APP == Published data: {"orderId":8}
== APP == Published data: {"orderId":9}
== APP == Published data: {"orderId":10}
Subscriber output:
== APP == Subscriber received: {"orderId":1}
== APP == Subscriber received: {"orderId":2}
== APP == Subscriber received: {"orderId":3}
== APP == Subscriber received: {"orderId":4}
== APP == Subscriber received: {"orderId":5}
== APP == Subscriber received: {"orderId":6}
== APP == Subscriber received: {"orderId":7}
== APP == Subscriber received: {"orderId":8}
== APP == Subscriber received: {"orderId":9}
== APP == Subscriber received: {"orderId":10}
pubsub.yaml component file
When you run dapr init, Dapr creates a default Redis pubsub.yaml and runs a Redis container on your local machine, located:
- On Windows, under
%UserProfile%\.dapr\components\pubsub.yaml - On Linux/MacOS, under
~/.dapr/components/pubsub.yaml
With the pubsub.yaml component, you can easily swap out underlying components without application code changes.
The Redis pubsub.yaml file included for this Quickstart contains the following:
apiVersion: dapr.io/v1alpha1
kind: Component
metadata:
  name: orderpubsub
spec:
  type: pubsub.redis
  version: v1
  metadata:
  - name: redisHost
    value: localhost:6379
  - name: redisPassword
    value: ""
In the YAML file:
metadata/nameis how your application talks to the component.spec/metadatadefines the connection to the instance of the component.scopesspecify which application can use the component.
Step 1: Pre-requisites
For this example, you will need:
Step 2: Set up the environment
Clone the sample provided in the Quickstarts repo.
git clone https://github.com/dapr/quickstarts.git
Step 3: Subscribe to topics
In a terminal window, from the root of the Quickstarts clone directory
navigate to the order-processor directory.
cd pub_sub/csharp/sdk/order-processor
Recall NuGet packages:
dotnet restore
dotnet build
Run the order-processor subscriber service alongside a Dapr sidecar.
dapr run --app-id order-processor --components-path ../../../components --app-port 7002 -- dotnet run
In the order-processor subscriber, we’re subscribing to the Redis instance called orderpubsub (as defined in the pubsub.yaml component) and topic orders. This enables your app code to talk to the Redis component instance through the Dapr sidecar.
// Dapr subscription in [Topic] routes orders topic to this route
app.MapPost("/orders", [Topic("orderpubsub", "orders")] (Order order) => {
    Console.WriteLine("Subscriber received : " + order);
    return Results.Ok(order);
});

public record Order([property: JsonPropertyName("orderId")] int OrderId);
Step 4: Publish a topic
In a new terminal window, from the root of the Quickstarts clone directory,
navigate to the checkout directory.
cd pub_sub/csharp/sdk/checkout
Recall NuGet packages:
dotnet restore
dotnet build
Run the checkout publisher service alongside a Dapr sidecar.
dapr run --app-id checkout --components-path ../../../components -- dotnet run
In the checkout publisher, we’re publishing the orderId message to the Redis instance called orderpubsub (as defined in the pubsub.yaml component) and topic orders. As soon as the service starts, it publishes in a loop:
using var client = new DaprClientBuilder().Build();
await client.PublishEventAsync("orderpubsub", "orders", order);
Console.WriteLine("Published data: " + order);
Step 5: View the Pub/sub outputs
Notice, as specified in the code above, the publisher pushes a random number to the Dapr sidecar while the subscriber receives it.
Publisher output:
== APP == Published data: Order { OrderId = 1 }
== APP == Published data: Order { OrderId = 2 }
== APP == Published data: Order { OrderId = 3 }
== APP == Published data: Order { OrderId = 4 }
== APP == Published data: Order { OrderId = 5 }
== APP == Published data: Order { OrderId = 6 }
== APP == Published data: Order { OrderId = 7 }
== APP == Published data: Order { OrderId = 8 }
== APP == Published data: Order { OrderId = 9 }
== APP == Published data: Order { OrderId = 10 }
Subscriber output:
== APP == Subscriber received: Order { OrderId = 1 }
== APP == Subscriber received: Order { OrderId = 2 }
== APP == Subscriber received: Order { OrderId = 3 }
== APP == Subscriber received: Order { OrderId = 4 }
== APP == Subscriber received: Order { OrderId = 5 }
== APP == Subscriber received: Order { OrderId = 6 }
== APP == Subscriber received: Order { OrderId = 7 }
== APP == Subscriber received: Order { OrderId = 8 }
== APP == Subscriber received: Order { OrderId = 9 }
== APP == Subscriber received: Order { OrderId = 10 }
pubsub.yaml component file
When you run dapr init, Dapr creates a default Redis pubsub.yaml and runs a Redis container on your local machine, located:
- On Windows, under
%UserProfile%\.dapr\components\pubsub.yaml - On Linux/MacOS, under
~/.dapr/components/pubsub.yaml
With the pubsub.yaml component, you can easily swap out underlying components without application code changes.
The Redis pubsub.yaml file included for this Quickstart contains the following:
apiVersion: dapr.io/v1alpha1
kind: Component
metadata:
  name: orderpubsub
spec:
  type: pubsub.redis
  version: v1
  metadata:
  - name: redisHost
    value: localhost:6379
  - name: redisPassword
    value: ""
In the YAML file:
metadata/nameis how your application talks to the component.spec/metadatadefines the connection to the instance of the component.scopesspecify which application can use the component.
Step 1: Pre-requisites
For this example, you will need:
- Dapr CLI and initialized environment.
- Java JDK 11 (or greater):
- Oracle JDK, or
- OpenJDK
- Apache Maven, version 3.x.
Step 2: Set up the environment
Clone the sample provided in the Quickstarts repo.
git clone https://github.com/dapr/quickstarts.git
Step 3: Subscribe to topics
In a terminal window, from the root of the Quickstarts clone directory
navigate to the order-processor directory.
cd pub_sub/java/sdk/order-processor
Install the dependencies:
mvn clean install
Run the order-processor subscriber service alongside a Dapr sidecar.
dapr run --app-port 8080 --app-id order-processor --components-path ../../../components -- java -jar target/OrderProcessingService-0.0.1-SNAPSHOT.jar
In the order-processor subscriber, we’re subscribing to the Redis instance called orderpubsub (as defined in the pubsub.yaml component) and topic orders. This enables your app code to talk to the Redis component instance through the Dapr sidecar.
@Topic(name = "orders", pubsubName = "orderpubsub")
@PostMapping(path = "/orders", consumes = MediaType.ALL_VALUE)
public Mono<ResponseEntity> getCheckout(@RequestBody(required = false) CloudEvent<Order> cloudEvent) {
    return Mono.fromSupplier(() -> {
        try {
            logger.info("Subscriber received: " + cloudEvent.getData().getOrderId());
            return ResponseEntity.ok("SUCCESS");
        } catch (Exception e) {
            throw new RuntimeException(e);
        }
    });
}
Step 4: Publish a topic
In a new terminal window, from the root of the Quickstarts clone directory,
navigate to the checkout directory.
cd pub_sub/java/sdk/checkout
Install the dependencies:
mvn clean install
Run the checkout publisher service alongside a Dapr sidecar.
dapr run --app-id checkout --components-path ../../../components -- java -jar target/CheckoutService-0.0.1-SNAPSHOT.jar
In the checkout publisher, we’re publishing the orderId message to the Redis instance called orderpubsub (as defined in the pubsub.yaml component) and topic orders. As soon as the service starts, it publishes in a loop:
DaprClient client = new DaprClientBuilder().build();
client.publishEvent(
		PUBSUB_NAME,
		TOPIC_NAME,
		order).block();
logger.info("Published data: " + order.getOrderId());
Step 5: View the Pub/sub outputs
Notice, as specified in the code above, the publisher pushes a random number to the Dapr sidecar while the subscriber receives it.
Publisher output:
== APP == 7194 [main] INFO com.service.CheckoutServiceApplication - Published data: 1
== APP == 12213 [main] INFO com.service.CheckoutServiceApplication - Published data: 2
== APP == 17233 [main] INFO com.service.CheckoutServiceApplication - Published data: 3
== APP == 22252 [main] INFO com.service.CheckoutServiceApplication - Published data: 4
== APP == 27276 [main] INFO com.service.CheckoutServiceApplication - Published data: 5
== APP == 32320 [main] INFO com.service.CheckoutServiceApplication - Published data: 6
== APP == 37340 [main] INFO com.service.CheckoutServiceApplication - Published data: 7
== APP == 42356 [main] INFO com.service.CheckoutServiceApplication - Published data: 8
== APP == 47386 [main] INFO com.service.CheckoutServiceApplication - Published data: 9
== APP == 52410 [main] INFO com.service.CheckoutServiceApplication - Published data: 10
Subscriber output:
== APP == 2022-03-07 13:31:19.551  INFO 43512 --- [nio-8080-exec-5] c.s.c.OrderProcessingServiceController   : Subscriber received: 1
== APP == 2022-03-07 13:31:19.552  INFO 43512 --- [nio-8080-exec-9] c.s.c.OrderProcessingServiceController   : Subscriber received: 2
== APP == 2022-03-07 13:31:19.551  INFO 43512 --- [nio-8080-exec-6] c.s.c.OrderProcessingServiceController   : Subscriber received: 3
== APP == 2022-03-07 13:31:19.552  INFO 43512 --- [nio-8080-exec-2] c.s.c.OrderProcessingServiceController   : Subscriber received: 4
== APP == 2022-03-07 13:31:19.553  INFO 43512 --- [nio-8080-exec-2] c.s.c.OrderProcessingServiceController   : Subscriber received: 5
== APP == 2022-03-07 13:31:19.553  INFO 43512 --- [nio-8080-exec-9] c.s.c.OrderProcessingServiceController   : Subscriber received: 6
== APP == 2022-03-07 13:31:22.849  INFO 43512 --- [nio-8080-exec-3] c.s.c.OrderProcessingServiceController   : Subscriber received: 7
== APP == 2022-03-07 13:31:27.866  INFO 43512 --- [nio-8080-exec-6] c.s.c.OrderProcessingServiceController   : Subscriber received: 8
== APP == 2022-03-07 13:31:32.895  INFO 43512 --- [nio-8080-exec-6] c.s.c.OrderProcessingServiceController   : Subscriber received: 9
== APP == 2022-03-07 13:31:37.919  INFO 43512 --- [nio-8080-exec-2] c.s.c.OrderProcessingServiceController   : Subscriber received: 10
pubsub.yaml component file
When you run dapr init, Dapr creates a default Redis pubsub.yaml and runs a Redis container on your local machine, located:
- On Windows, under
%UserProfile%\.dapr\components\pubsub.yaml - On Linux/MacOS, under
~/.dapr/components/pubsub.yaml
With the pubsub.yaml component, you can easily swap out underlying components without application code changes.
The Redis pubsub.yaml file included for this Quickstart contains the following:
apiVersion: dapr.io/v1alpha1
kind: Component
metadata:
  name: orderpubsub
spec:
  type: pubsub.redis
  version: v1
  metadata:
  - name: redisHost
    value: localhost:6379
  - name: redisPassword
    value: ""
scopes:
  - orderprocessing
  - checkout
In the YAML file:
metadata/nameis how your application talks to the component.spec/metadatadefines the connection to the instance of the component.scopesspecify which application can use the component.
Step 1: Pre-requisites
For this example, you will need:
Step 2: Set up the environment
Clone the sample provided in the Quickstarts repo.
git clone https://github.com/dapr/quickstarts.git
Step 3: Subscribe to topics
In a terminal window, from the root of the Quickstarts clone directory
navigate to the order-processor directory.
cd pub_sub/go/sdk/order-processor
Install the dependencies and build the application:
go build .
Run the order-processor subscriber service alongside a Dapr sidecar.
dapr run --app-port 6002 --app-id order-processor-sdk --app-protocol http --dapr-http-port 3501 --components-path ../../../components -- go run .
In the order-processor subscriber, we’re subscribing to the Redis instance called orderpubsub (as defined in the pubsub.yaml component) and topic orders. This enables your app code to talk to the Redis component instance through the Dapr sidecar.
func eventHandler(ctx context.Context, e *common.TopicEvent) (retry bool, err error) {
	fmt.Println("Subscriber received: ", e.Data)
	return false, nil
}
Step 4: Publish a topic
In a new terminal window, from the root of the Quickstarts clone directory,
navigate to the checkout directory.
cd pub_sub/go/sdk/checkout
Install the dependencies and build the application:
go build .
Run the checkout publisher service alongside a Dapr sidecar.
dapr run --app-id checkout --app-protocol http --dapr-http-port 3500 --components-path ../../../components -- go run .
In the checkout publisher, we’re publishing the orderId message to the Redis instance called orderpubsub (as defined in the pubsub.yaml component) and topic orders. As soon as the service starts, it publishes in a loop:
client, err := dapr.NewClient()

if err := client.PublishEvent(ctx, PUBSUB_NAME, PUBSUB_TOPIC, []byte(order)); err != nil {
    panic(err)
}

fmt.Println("Published data: ", order)
Step 5: View the Pub/sub outputs
Notice, as specified in the code above, the publisher pushes a numbered message to the Dapr sidecar while the subscriber receives it.
Publisher output:
== APP == dapr client initializing for: 127.0.0.1:63293
== APP == Published data:  {"orderId":1}
== APP == Published data:  {"orderId":2}
== APP == Published data:  {"orderId":3}
== APP == Published data:  {"orderId":4}
== APP == Published data:  {"orderId":5}
== APP == Published data:  {"orderId":6}
== APP == Published data:  {"orderId":7}
== APP == Published data:  {"orderId":8}
== APP == Published data:  {"orderId":9}
== APP == Published data:  {"orderId":10}
Subscriber output:
== APP == Subscriber received:  {"orderId":1}
== APP == Subscriber received:  {"orderId":2}
== APP == Subscriber received:  {"orderId":3}
== APP == Subscriber received:  {"orderId":4}
== APP == Subscriber received:  {"orderId":5}
== APP == Subscriber received:  {"orderId":6}
== APP == Subscriber received:  {"orderId":7}
== APP == Subscriber received:  {"orderId":8}
== APP == Subscriber received:  {"orderId":9}
== APP == Subscriber received:  {"orderId":10}
Note: the order in which they are received may vary.
pubsub.yaml component file
When you run dapr init, Dapr creates a default Redis pubsub.yaml and runs a Redis container on your local machine, located:
- On Windows, under
%UserProfile%\.dapr\components\pubsub.yaml - On Linux/MacOS, under
~/.dapr/components/pubsub.yaml
With the pubsub.yaml component, you can easily swap out underlying components without application code changes.
The Redis pubsub.yaml file included for this Quickstart contains the following:
apiVersion: dapr.io/v1alpha1
kind: Component
metadata:
  name: orderpubsub
spec:
  type: pubsub.redis
  version: v1
  metadata:
  - name: redisHost
    value: localhost:6379
  - name: redisPassword
    value: ""
scopes:
  - orderprocessing
  - checkout
In the YAML file:
metadata/nameis how your application talks to the component.spec/metadatadefines the connection to the instance of the component.scopesspecify which application can use the component.
Tell us what you think!
We’re continuously working to improve our Quickstart examples and value your feedback. Did you find this Quickstart helpful? Do you have suggestions for improvement?
Join the discussion in our discord channel.
Next steps
- Set up Pub/sub using HTTP instead of an SDK.
- Learn more about Pub/sub as a Dapr building block
Feedback
Was this page helpful?
Glad to hear it! Please tell us how we can improve.
Sorry to hear that. Please tell us how we can improve.